COS265 Setup Document
We will be using several technologies in COS265, such as IntelliJ and GitLab. This page will guide you through the steps to setting up and working with these technologies as well as stepping you through the process of starting, working on, and submitting assignments.
Updated: 2026.10.09
Quick Links
Below are links to major sections of this document.
- Starting the Semester
- Installing IntelliJ
- Activating GitLab Account
- Setting up IntelliJ with GitLab
- Installing and Setting up Slack
- Setting up Plickers Card
- Starting an Assignment
- Cloning GitLab Repo
- Reopening the Project
- Setting up JDK / Java SDK
- Working on a Assignment
- Project Folder Structure
- Modifying Source Code
- Running
- Adding New Files
- Java Packages and Features
- The
readme.mdFile
- Peer/AI Attribution
- Terms
- Caveats
- Implementation
- Working with Git
- The Git Workflow and Model
- Detached Head
- Committing Changes
- Pushing Commits
- Pulling Commits
- Issues
- Updating Fork
- Automated Tester
- Reading Tester Results
- Score Labels
- Submitting a Assignment
Below are links to the software we will be using in COS265.
- IDEA IntelliJ
- CSE GitLab
- Slack
- Workspace: TU CSE Students
- Channel: #cos265-2026-fall
- Plickers
Starting the Semester #
This section walks you through setting up software and accounts. You should only need to follow the steps in this section once at the start of the semester.
Installing IntelliJ
Note
All of the computers in Euler 103, 201, 217, and 218 should already have the IntelliJ software installed for Windows and Linux, so unless you are using your own machine you may skip ahead to the next section.
Warning
All JetBrains products assume that the project files are on the local machine. Since you will likely be using the lab machines, and therefore the files are mapped in from a network drive, IntelliJ might run very slowly or stop respondind altogether. This seems to happen more often under Windows than under Linux. If this happens to you, try logging in under Linux, or copy the project folder to the local machine.
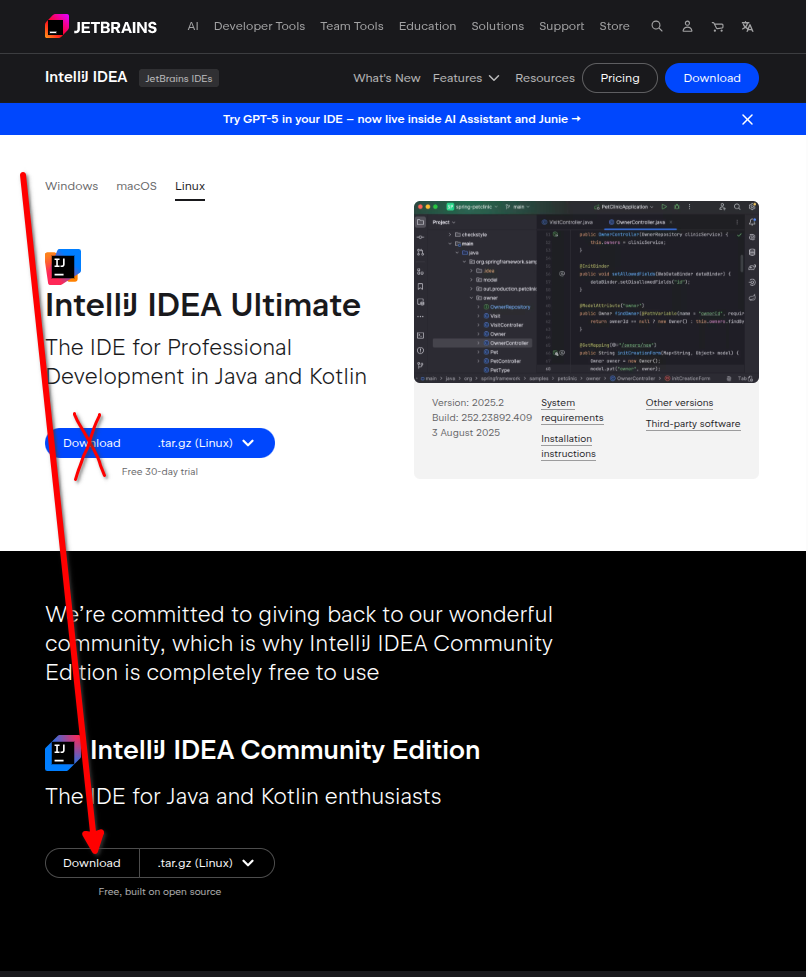
If you plan to work only on the CSE machines in COS265, you can skip to the next section. If you would like to use your own machine, you will need to install IntelliJ.
- Go to IntelliJ IDEA.
- Click the
Downloadbutton. - Scroll down to
Communityand click theDownloadbutton- Note: download the
Communityedition; do NOT downloadUltimate
- Note: download the
- Follow the appropriate step below for your operating system
- On Windows, execute the downloaded binary file to install the IntelliJ software.
- On Linux, untar the downloaded file containing the IntelliJ software to a location that you can remember.
- On OSX, "mount" the downloaded image and drag the IntelliJ software to your desktop or Applications folder.
Activating GitLab Account
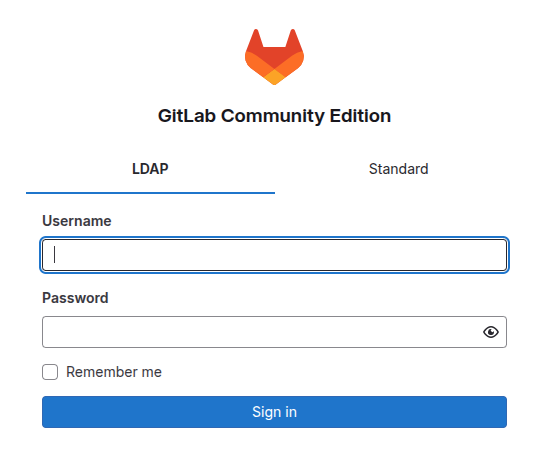
We will use CSE GitLab to manage all the assignments. Each student will have their own private repo for each assignment. You will clone, edit, commit, and push to your assignment repo. No code will be submitted over email or Slack or through the LMS.
All CSE students and non-CSE students taking a COS or SYS course already have accounts on our CSE GitLab, but it is not fully activated until your first log in.
Simply go to CSE GitLab and log in using your CSE credentials.
Note
Your login credentials are your CSE credentials, NOT your Taylor credentials. In other words, use the same login username and password that you use when logging into a CSE computer.
Go to CSE Password Change Form if you need to reset your password.
Note
We have our own CSE GitLab server. We are NOT using GitLab.com or GitHub.com.
Important
Source code repositories must be kept private. Do not create a public fork of any of the course repos.
Setting up IntelliJ with GitLab
IntelliJ has a built-in git system that makes it simple to clone, commit, push, and pull, but you will need to create an access token to give IntelliJ permission to work with CSE GitLab.
If you see the Welcome to IntelliJ IDEA screen, click Clone Repository.
If you already have another project open, click the "hamburger menu" in top-left corner, then File > New > Project from Version Control...
- Choose GitLab
- Server:
https://repo.cse.taylor.edu - Click
Generate- Choose date after end of semester
- Click
Create - Copy Token to clipboard
- Paste Token
- Click
Log In - You should see a list of repos (might be empty)
Note
If you plan to work on multiple machines (ex: lab machine and your laptop), each IntelliJ instance will need an access token. You can reuse the same token for all instances (not secure) or you can create a new token for each instance (more secure).
Installing and Setting up Slack
We will use Slack for online communications. Slack's Huddle feature can be used for virtual office hours.
I have created a course Slack channel #cos265-2026-fall, and all students and TAs should have received an invite to join that channel. Accept the invite.
Students are recommended to download the Slack desktop app instead of using the web-based version.
Important
All discussions over the course Slack channel must not include source code, whether as text or screenshot. Any questions about specific code must be sent as a DM to the instructor or a TA.
Setting up Plickers Card
We will use Plickers to take attendance and manage pop-quizzes. Plickers (Paper cLICKER) allows you to answer a multiple choice quiz without any additional technology. You simply orient and hold up a card with a QR-Code-like front so my phone can see the code. Depending on the orientation of the card, you give your answer to the question.
I will hand you your Plickers card on the first day of class.
Keep this card, and bring it to all classes and labs.
On the back of the card, you will see your name, this course, your Plickers number, and four letters (ABCD).
To answer C (for example), orient the card so the C on the back is up and the front of the card is facing my phone.
Be sure to keep your fingers away from the black on the front, as that prevents my phone from registering your answer.
If you forget your card, you can use the Plickers Card Viewer on your mobile to provide answers. When you first go to the site, you will need to set it up for this course.
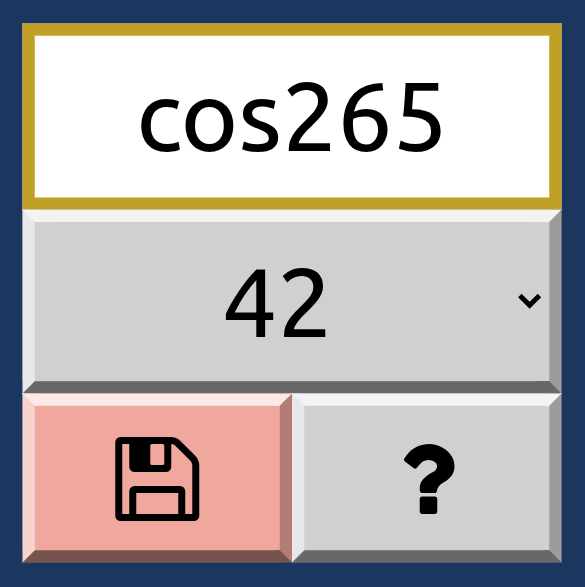
- On the setup page for Plickers Card Viewer
- Enter the course in the top field (can be anything, only used as label)
- Choose your Plickers number for this course in the dropdown
- Tap the Save icon
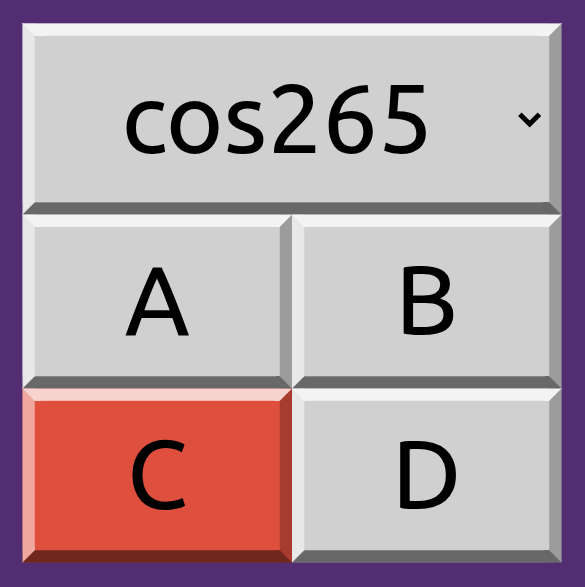
- Choose the correct course from the dropdown (only one now, but you can use this viewer for other courses, too)
- Tap the letter with which you want to answer
- Show the QR-Code-like graphic to my phone.
 |
 |
 |
Note
No need to rotate your device. The graphic is already oriented to give the answer you chose.
Starting an Assignment #
The sections below describe how to set up each assignment. You will need to follow these steps at the start of every assignment.
Cloning GitLab Repo
If you see the Welcome to IntelliJ IDEA screen, click Clone Repository.
If you already have another project open, click the "hamburger menu" in top-left corner, then File > New > Project from Version Control...
-
Choose
GitLab -
Select or enter correct repository
-
Update
Directoryif needed -
Click
Clone- Note: This may take a while...
-
If prompted, click either
This WindoworNew Window -
If prompted, click
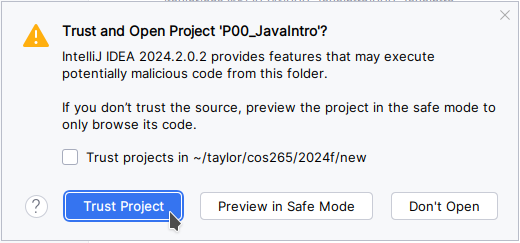
Trust Project. This security feature is asking if you would like to allow IntelliJ to execute commands in the project. There are no commands in the COS265 projects, so you may safely click onTrust Project.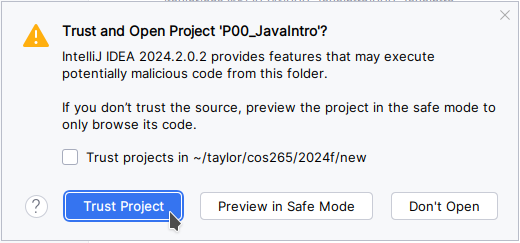
-
If you see a warning message in the bottom-right corner of IntelliJ stating
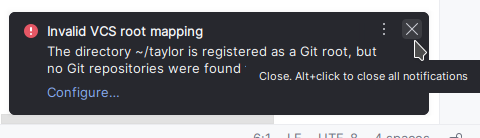
Invalid VCS root mapping, you can safely ignore it by simply clicking the × in the top-right corner of the warning.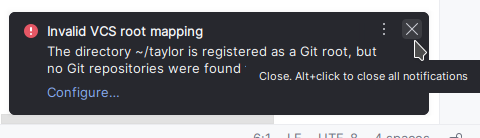
Once you have completed the steps above, the project should automatically open, and you are now ready to start the assignment!
Reopening the Project
Important
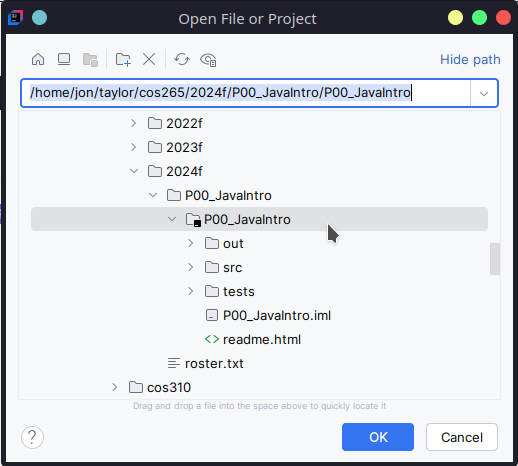
When you reopen an IntelliJ project that you already cloned, be sure to open the project folder and not a regular folder, otherwise IntelliJ will not work correctly.
A project folder is distinguished from a regular folder by a small black box with a white line in the bottom-right corner of folder icon.
In the screenshot below, there are two folders called P00_JavaIntro, but only one (the selected one that the mouse is hovering) is the correct project folder.
Setting up JDK / Java SDK
After you open an IntelliJ project, if you notice a yellow JDK "XX.Y.Z" is not found on the disk or corrupted banner across the top of the editor and many words are colored or underlined in red, you will need to install the Java Software Development Kit (SDK or JDK) by following the steps below.
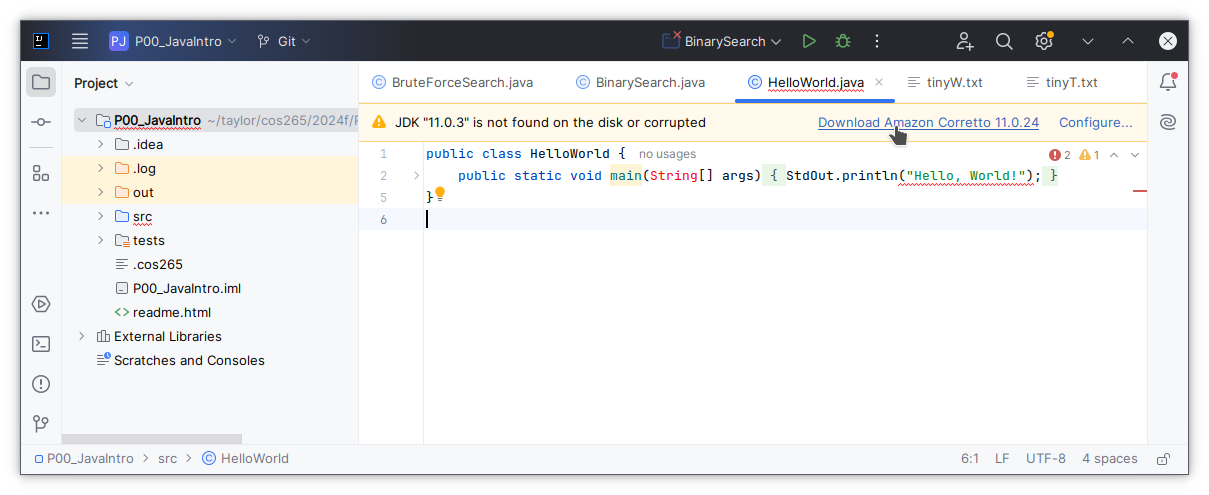
Click on the Download Amazon Corretto 11.0.21 link in the banner.
This will tell IntelliJ to download and install the appropriate JDK.
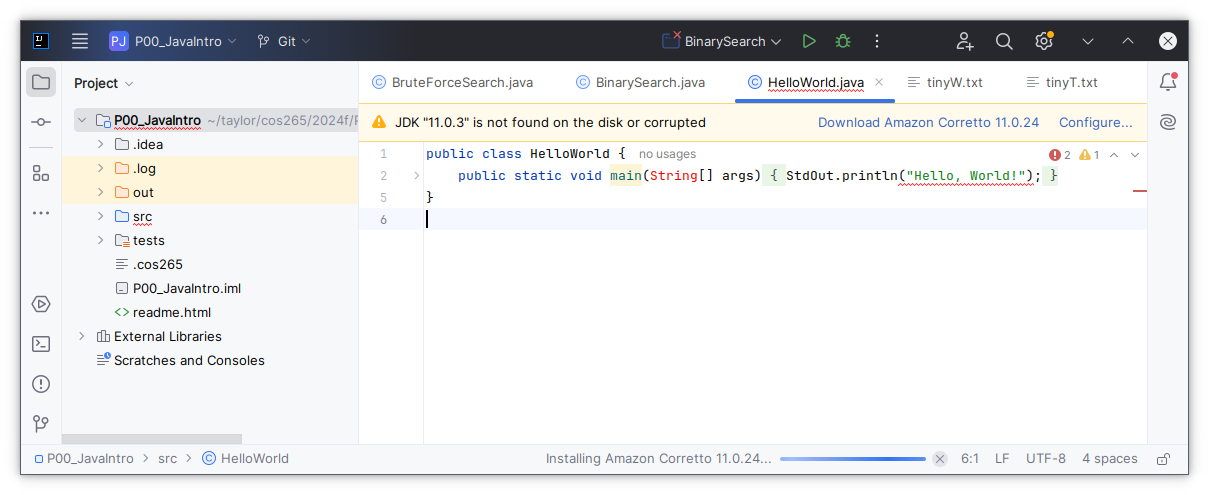
After installing the JDK, IntelliJ will start indexing the symbols in the JDK. This may take a few minutes to finish. The statusbar at the bottom of IntelliJ will report the progress as a progress bar. Notice that the red squiggles are still present.
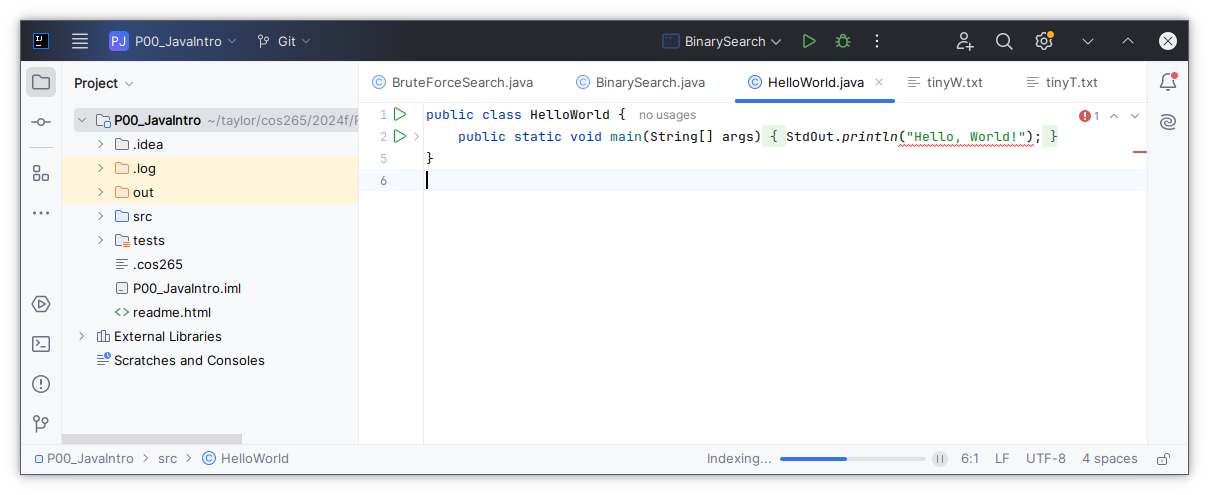
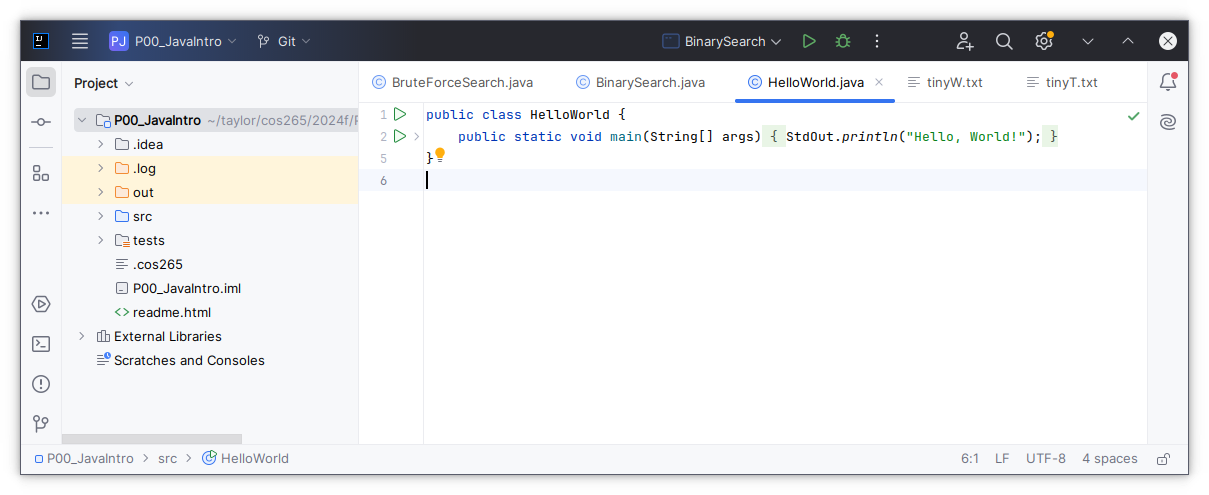
Once the JDK is indexed, all of the red squiggles should be gone in IntelliJ, and you should be able to run the project by clicking on the green play button.
Important
You may use any JDK version later than 12, but you are not allowed to use any feature available in these later versions. I will run your code using JDK12, and your code will fail if you use these features.
Working on an Assignment #
This section describes how to work on the COS265 assignments.
Project Folder Structure
In general, your project folder will contain a few sub-folders and a few files. Below is an example of the folder structure along with some inlined comments. See the following text for more details.
P00_JavaIntro/...               <- IntelliJ Project Folder
 ├─ P00_JavaIntro.iml           <- IntelliJ Project File
 ├─ .idea/...                   <- IntelliJ-related files
 │
 ├─ .git/...                    <- Local Git repo             **DO NOT EDIT**
 ├─ .gitignore                  <- Files for Git to ignore    **DO NOT EDIT**
 ├─ .gitmodules                 <- Files for Git to include   **DO NOT EDIT**
 │
 ├─ out/...                     <- Java binaries built from source
 │
 ├─ libs/...                    <- Java Libraries for the course
 │   ├─ algs4.jar               <- Java Library of algorithms from book
 │   └─ stdlib.jar              <- Java Library of useful routines (ex: I/O)
 │
 ├─ src/...                     <- Java files that you might need to modify
 │   ├─ BinarySearch.java       <- Java file that you might need to modify
 │   ├─ BruteForceSearch.java   <- Java file that you might need to modify
 │   └─ HelloWorld.java         <- Java file that you might need to modify
 │
 ├─ data/...                    <- Additional test input files you create
 ├─ data_ref/..                 <- Test input files           **DO NOT EDIT**
 │
 └─ readme.md                   <- Fill this out before submission!
The P00_JavaIntro.iml file at the root and everything under the .idea/ sub-folder provide IntelliJ the details about the project.
Do not modify these files directly.
The .git/ folder and .gitignore and .gitmodules files are used by Git.
Git will change these files as you add, commit, push, and pull.
Do NOT edit these files directly.
Important
Do NOT directly edit any of the files used by Git! Changing these files can cause you to lose work.
The out/ folder contains the binaries (compiled Java files) of your code.
These files will be rewritten everytime you build your program.
The libs/algs4.jar and libs/stdlib.jar files are Java libraries containing many useful classes that we will use throughout the course.
These files are provided by the Algorithms book website.
You may use only the libraries, classes, etc. that are explicitly specified in the assignment write-up.
The src/ folder contains the Java source code that we provide and the Java framework / bare-bone source code files that you will modify.
All of your source code should go in this folder.
The data/ and data_ref/ folders contains test input files.
You are encouraged to create your own test input files under data/!
Warning
All changes under data_ref/ folder will be ignored, so be sure to put your data files under data/.
The readme.md file is your way of documenting and reflecting over your work.
See the next section.
Modifying Source Code
You may modify any of the files in the project or create any additional files. However, changes made to files indicated as not modifiable in project write up and all newly added files will be completely ignored when tested and graded. If your solution depends on the content of these files, your solution will not receieve full credit, possibly a zero.
When you change the files indicated as modifiable, do NOT change the public API (public methods), otherwise your solution will not receive full credit, possibly a zero. You may create additional methods (private only), data members (private only), and private classes to help you solve and test your implementation. We will not test any additional code.
The public API includes all the following parts of functions, methods, and data members:
- visibility/protectedness (
public,private) - name
- return type
- argument types
- argument ordering
The assignment framework will contain stubs for all public functions and classes that you will need to implement. If your solution requires creating a new file or including another file, your solution is likely incorrect and needs to be reworked. Talk with me if you are having difficulty with this.
This course is at least your third computer science course. Therefore, at the very least, you are expected to submit code that compiles.
Important
Code that contains compilation errors will receive an automatic zero.
We will not grade commented-out code or pseudo-code.
You are expected to write code that produces correct answers. However, many of the problems in this course will require handling many edge cases, require careful thought, and may require clever or creative solutions to receive full credit. Correct but inefficient code may receive only partial credit.
We strongly encourage you to write your own unit tests in the main() method for each Java class and to create additional test data files.
We will not test this code.
Running #
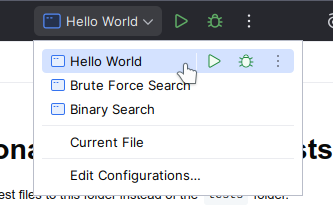
To run your program, click the green play button in the main toolbar.
Each project can have multiple programs. You can indicate which program should be run by selecting it from the dropdown just left of the green play button.
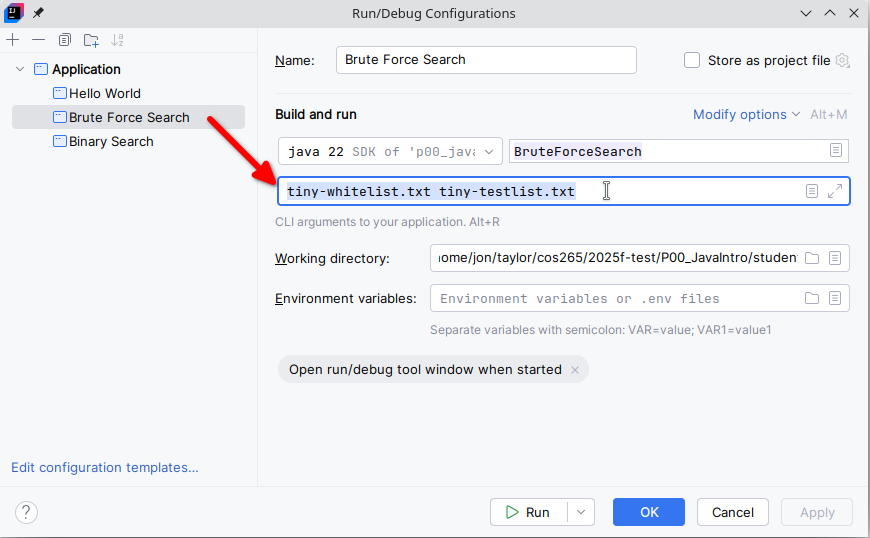
Each program can have its own command line arguments.
To change these arguments, click the dropdown just left of the green play button, then click Edit Configurations....
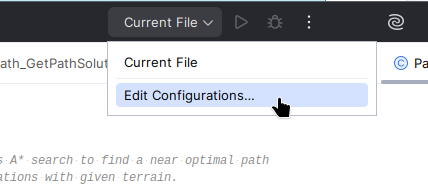
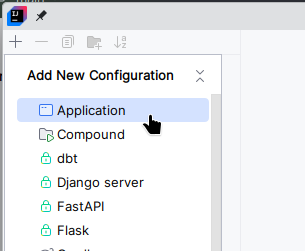
If for some reason you do not see any run configurations, it is fairly easy to add new ones by clicking clicking Edit Configurations....
Then, click the + in the top-left corner, and then Application in the dropdown.
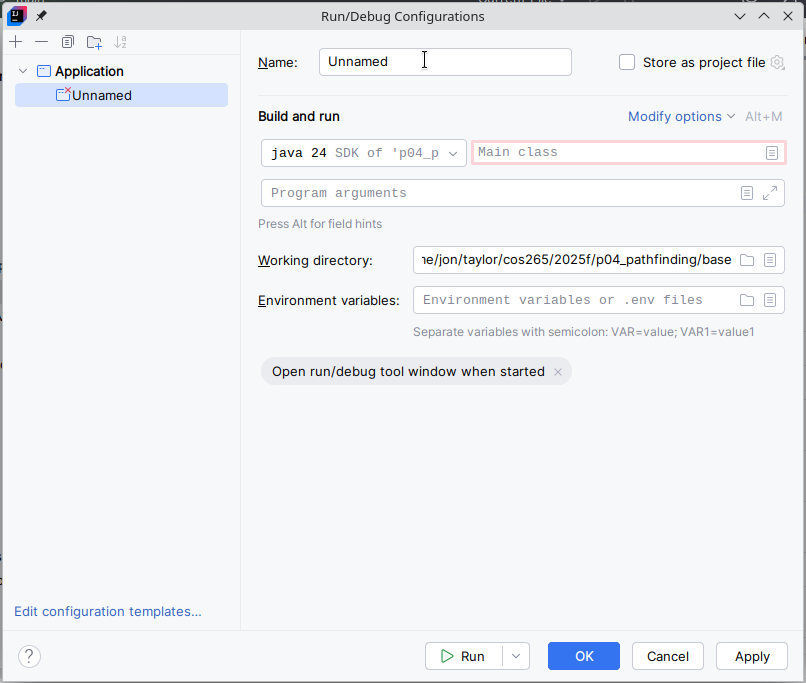
Then, in the Name texbox, you can enter anything that is meaningful.
In the textbox with red outline and Main class, enter or choose the Java class that you want to run, then click OK button.
Adding New Files
You may create any additional files in your project, but use caution when creating new Java files.
Important
If your solution depends on files you added to work correctly, your solution will not receieve full credit, possibly a zero. Your solution should be completely contained in the appropriate Java files provided by the starting framework, because testing/grading will only consider the changes made to the files noted as modifiable in the write up. The tester/grader will ignore all other files.
That said, you are strongly encouraged to create additional input test files and additional Java classes for testing purposes!
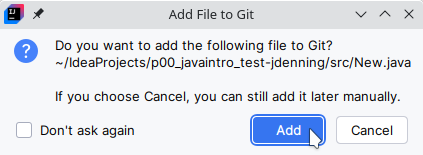
If you add a new file (whether additional Java files for testing or input test files), IntelliJ will ask if you would like to add it to Git.
Always click Add.
Warning
When creating new input test files, do NOT place them in the data_ref/ folder, as these will be ignored.
Instead, place your own input test files in the data/ folder.
Java Packages and Features
Java is an extensive language, where many CS problems have been solved neatly in Java packages. Regardless, the objectives of this course are to teach you how to solve these problems on your own, building critical thinking and problem solving skills, so that you can are able to solve more challenging, unsolved problems at a later time.
Therefore, for this course, you may NOT import any Java package that is not explicitly in the initial framework or described in the respective project write up. Furthermore, you may not use any functional programming or similar language features.
You might lose points if your submission imports additional packages, and you might receive a 0 if your solution requires packages outside of what is deemed acceptable.
If you have any questions, talk to me first.
The readme.md File
Each assignment will have a readme.md at the root that you will modify.
Treat this like a lab notebook for a science class, where you take notes about the experiments you run, questions you have, things you noticed, etc.
More specifically, this file acts as a write-up document where you will contain answers to specific questions about your implementation, answers computed by your solution, known bugs in your implementation, and other comments.
For more info on Markdown in GitLab, check out GitLab Flavored Markdown (GLFM).
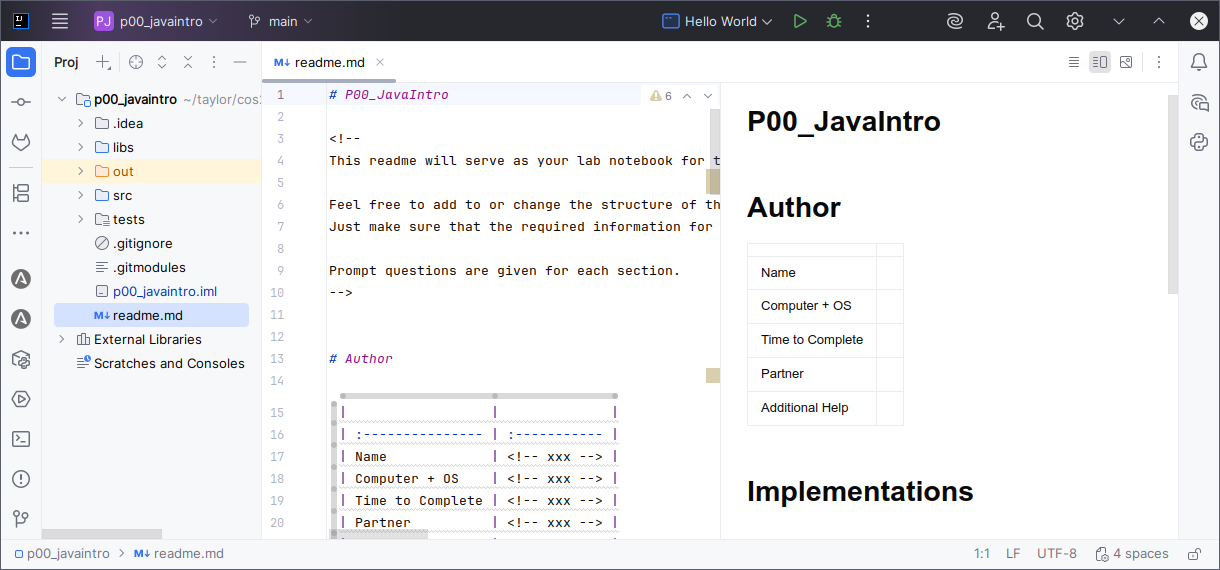
You can edit and/or preview this file directly in IntelliJ.
Note
When you open the readme.md file, there are three options in the top-right corner of the window that change the view between Source, Source+Render, and Render.
Selecting the Source+Render will show a side-by-side view, where you can edit the file on the left and see the rendered result on the right.
Be sure to do all of the following:
- Answer all the questions listed in the write up.
- Fill out any tables.
- You can (and should) add additional rows or columns to fit your data.
- Answer all the questions in comments that apply to your submission.
- Add any additional information that will help with grading your submission.
- Identify all sources of help you received!
- This includes COS265 peers, roommates, TAs, websites, AI, etc.
Important
Maintaining academic integrity requires identifying and citing all sources of help you received. This includes help from another human, online resources, AI, and so on. If we determine that you received outside help from a source you did not identify, we will treat this as Academic Dishonesty issue, which can result in a failing grade for the course and additional consequences.
See the Peer/AI Attribution section and Course Syllabus for more details.
Peer/AI Attribution #
All code must come with attribution of the author. I will assume that anything you do not explicitly attribute to another author (whether human or AI) was created by you on your own.
Important
Attributions should always be explicit and clear. Always disclose from where your code and comments came.
It is your responsibility to completely understand and steward anything that you contribute, regardless of who was the original author. In other words, you should be ready to provide a detailed explanation for and to replicate ex sola mente any block or line of code, logical expression, or comment that you submit. You should be prepared to explain and replicate any portion of that contribution at any time.
Failure to properly attribute code not written completely by you (ex: code from generative AI, an AI-assistant, an Internet source, TA or peer in the course, past students, etc.) will result in disciplinary action, such as receiving a zero score on the assignment, being written up for academic dishonesty, failing the course, and so on.
Warning
While I do not take the posture of "guilty until proven innocent", I have seen hundreds of student submissions by now, so I have an expectation of the quality of code submitted. If your code falls outside that expectation, I will start investigating.
terms
The following subsections provide descriptions for the terms we will use to provide attribution.
terms: areas of collaboration
Collaboration will fall into the following three areas.
| Area | Collaboration used to... | Indicated in... |
|---|---|---|
understand |
Understand the problem | readme.md |
develop |
Develop a solution (ex: on whiteboard) | readme.md |
implement |
Implement a solution (ex: editor or written Java) | readme.md, *.java |
debug |
Debugging | readme.md, *.java |
Any attribution made as comments in Java files will be assumed to relate to implementation or debugging areas.
In the readme.md, there will be clear places where attribution toward understanding the problem or developing a solution can be made.
terms: contributors
We will use the following terms to identify three different contributors.
| Contributor | Indicates work done by... |
|---|---|
self |
You and/or partner/group as defined for project |
peer |
Another human (classmate other than partner/group, TA, someone online, etc.) |
ai |
Any trained model (ChatGPT, Gemini, etc.) |
terms: levels of contribution
We will adopt a simplification of the AI Disclosure, which is a combination of W3C AI Content Disclosure (behind open standards of world wide web) and SPDX (driven by the Linux Foundation). We will recognize four levels of assistance listed in the table below (modification of W3C AI Content Disclosure vocabulary).
| Level | Self | Peer/AI | Meaning |
|---|---|---|---|
none |
Fully | None | Positive assertion of self authorship and no outside involvement |
assisted |
Mostly | Some | Mostly self-authored; Peer/AI edited, refined, filled in boilerplate, or lightly debugged |
generated |
Some | Mostly | Written or significantly debugged by peer or AI-generated with prompting, integration, and review by self |
autonomous |
None | Fully | Written or debugged by peer AI without meaningful oversight by self |
If no attribution is given, none will be assumed.
Always indicate the highest level that captures the maximum amount of assistance you received from a peer or AI, even if you significantly modified the code that was given to you. If the current state of code is very different from the initial assistance, you may indicate that in the meta information of the comment.
Even if you do not "copy-paste" the code generated by AI or by a peer into your project, it is your responsibility to disclose clearly what information you used to arrive at your solution.
Caveats
Referencing your book or lecture material does not require attribution.
Asking a search engine, peer, LLM, TA, etc. a question that involve basic Java syntax and semantics (for example, Google search for "java basic hello world program") falls under the none level of attribution.
This is similar to looking something up in a book, where the answers apply to general programming.
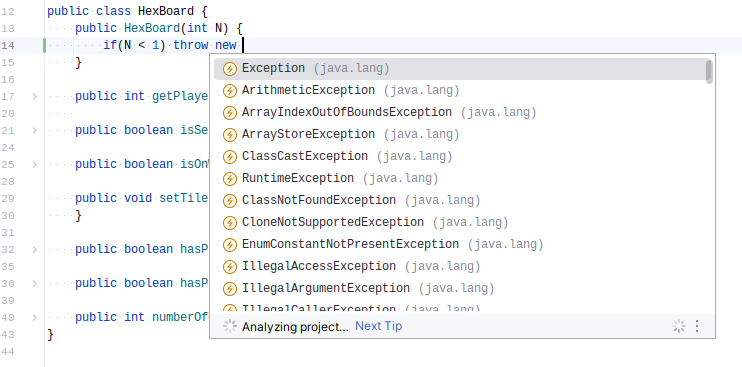
Similarly, IntelliJ's code completion feature would fall under none level of attribution, because it is providing information about the language or the implementation and not the problem being solved.
In other words, I would not consider the suggestions that IntelliJ shows as you code to be AI assistance, because these suggestions have everything to do with what fits in at your cursor given the surrounding context and nothing to do with what the code is actually doing.
However, once the questions asked or the answers given start heading toward solving the problem, the level of assistance has gone up.
Implementation
Attribution in the area of implentation and debugging is indicated using a comment with peer- and/or ai- as prefix of the level (none, debugged, assisted, generated, autonomous).
If attribution applies only to a single line, then append the comment to the end of that line. If attribution applies to a sequence of lines, add a comment on the line before the sequence to indicate the start of attribution, and then add a comment after the sequence to end / switch attribution. No ending comment is required if the attribution applies to all following lines of the current scope level / nested block. If the attribution applies to the whole file, add an attribution comment at the top of file. If the attribution applies to an entire function, add an attribution comment at the top of the function body.
You may add additional meta information in the attribution comment.
This additional information can , such as AI model and version (ex: anthropic/opus 4.6) or the scope of AI use (hand-written implementation; ai-generated tests).
The following examples show how attribution applies in different scenarios.
On the left, the ai-assisted attribution (to Anthropic Opus 4.6) applies to the entire file, so the attribution comment is at the very top of the file.
On the right, line 4 was ai-generated (no model specified) while lines 1–2 and 6–8 were written without AI.
If the comment on line 5 of right example was removed, the ai-generated attribution would apply to the rest of the lines of the main function.
// ai-assisted: anthropic/opus 4.6

public class HelloWorld {
    public static void main(String[] args) {
        StdOut.println("Hello, World!");
        StdOut.println('Goodbye, World!');
    }
}
public class HelloWorld {
    public static void main(String[] args) {
        // ai-generated
        StdOut.print("Hello, World!");
        // ai-none
        StdOut.println('Goodbye, World!');
    }
}
In the following example, line 3 is attributed to be assisted by AI (specifically claude 3.5 sonnet), line 5 is attributed to be debugged by Peer (TA), but line 4 is assumed to have been written without any assistance (whether peer/AI or implementation/debugging) as it has no attribution.
public class HelloWorld {
    public static void main(String[] args) {
        StdOut.println("Hello, World!");     // ai-assisted: claude 3.5 sonnet
        StdOut.println("Foo is such a silly word");
        StdOut.println('Goodbye, World!');   // peer-assisted: ta helped debug
    }
}
Working with Git #
Git is the industry standard for source code version control. Git keeps track of the history of changes and helps with merging edits from multiple developers. Git is an extensive tool with many features, but we will use only a small and limited number of actions in this course.
This section walks you through these basic set of actions.
The Git Workflow and Model
Git manages source code using a database to store history of changes in a directed graph. Git differs from Subversion (SVN, another popular version control systems) by making full copies (clones) of the entire source code database rather than simply checking out a particular snapshot. Clones allow developers to work completely independently while still providing mechanisms for combining work relatively easily. Clones also allow the source code to be backed up across multiple remote platforms (ex: GitLab or GitHub) However, the Git model can also get confusing, so here is a diagram of some basic commands.
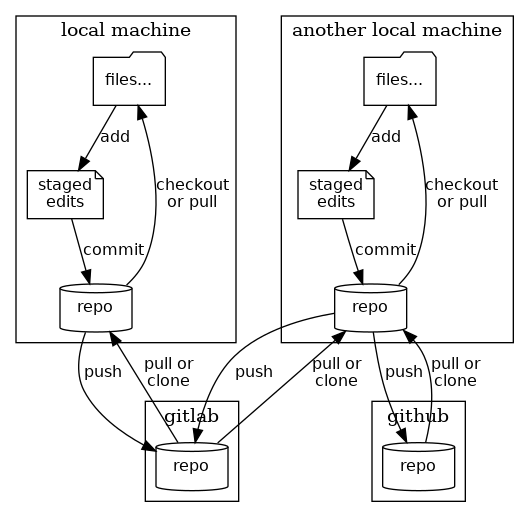
Here is a simple example workflow for a developer working on local machine.
-
git clone https://github.com/company/projectClone a repo hosted on GitHub to make an exact copy of the repo on the local machine.
-
Local developer makes changes to the file
Game.javaand adds a new filePlayer.java. Note: These changes are not recorded by git, and no one else can see these changes. -
git add Game.java Player.javaStage the changes to the files. This tells git that you are planning to commit these changes, but note that the changes are not yet committed to the repo.
-
git commitCommit all the staged changes to the local repo. Note: Other developers cannot see these changes yet, because they are still only stored locally.
-
git pushPush all locally committed changes to the remote GitHub repo that we cloned on the first step. At this point, other developers can see these changes!
-
Suppose that another developer on another machine makes some changes to their local repo and then stages, commits, and pushes those changes to the GitHub repo.
-
git pullPull all changes stored on remote repo and (attempt to) merge them into the local repo. At this point, this local developer can see the changes that were made by the other developer.
Note
The git ... actions above are the commands to perform the actions from a terminal.
IntelliJ has a built-in git system, which allows you to perform the above actions all within IntelliJ.
The following subsections provide more details.
Warning
Suppose you and another developer have made changes, and that other dev has pushed those changes to the remote repo. Most remote repos will not allow you to push your changes until after you have pulled and merged the other dev's changes into your local repo. It might seem annoying at first, but this restriction forces you to check that you can successfully merge all the changes into the project first. It's good to have a human in the loop.
One other important thing to understand about Git is how it tracks changes over time. Git uses a directed graph, where every commit is a node, and directed edges connect commits where the head of edge is the original commit and the tail points to a commit that changed the original. Over time, the graph will become very large, and it can become tricky navigating all that history. Git uses two ways of labeling that aid in navigation: tags and branches.
Branches label certain paths in history.
They allow developers to work on bugs or new features without breaking the main branch for other developers.
Think of this like one universe breaking off into two parallel universes at a certain point in time.
The developer can work on one branch, then switch to another branch, and then switch back to continue working.
When the developer is ready for the changes made in one branch to be included into another, they can perform a branch merge.
The most important branch is called main, which is created at the start of every repo.
Think of it as the sacred timeline.
Tags label certain commits in history, allowing developers to indicate certain commits as having particularly special meaning.
For example, a project can indicate different points in edit history when major or minor releases of the project went out to the public.
A developer can then checkout a certain tag to see exactly how the code when that release occured.
The most important tag is called HEAD, which is always pointing at commit that you are currently work on.
Think of it as where you are right "now" on the current timeline.
Warning
If you ever get the git error "detached HEAD", it just means that you are working on a commit that does not belong to a branch. This can occur if you go to a previous commit and start making changes, or if you and another developer make changes and then you pull in the other's changes. There are several ways to resolve this (a quick search for "fix git detached head" yields tons of results), but each way has a different effect. Overall, don't panic! Ask me if you ever get here and cannot figure out how to get back.
We will not spend time in this course working with branches or tags.
Just know that we will always use the main branch.
For more information, check out these two resources.
Detached Head
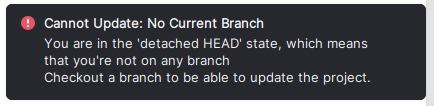
If you ever get the git warning "detached HEAD", it just means that you are working on a commit that does not belong to a branch. This can occur if you go to a previous commit and start making changes. Or it can occur if you and another developer make changes, they push, and then you pull in the other's changes. Or it can happen when you open the project for the first time.
The most important bit of advice: Don't Panic!
There are several ways to resolve this (a quick search for "fix git detached head" yields tons of results), but each way has a different effect
But likely the easiest way to get back to the main branch is to perform a rebase, which applies changes you've made since detached back onto the main branch.
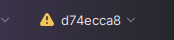
- Click on the git dropdown
- Under
Local, clickmain - Click
Checkout and Rebase onto 'xxx'
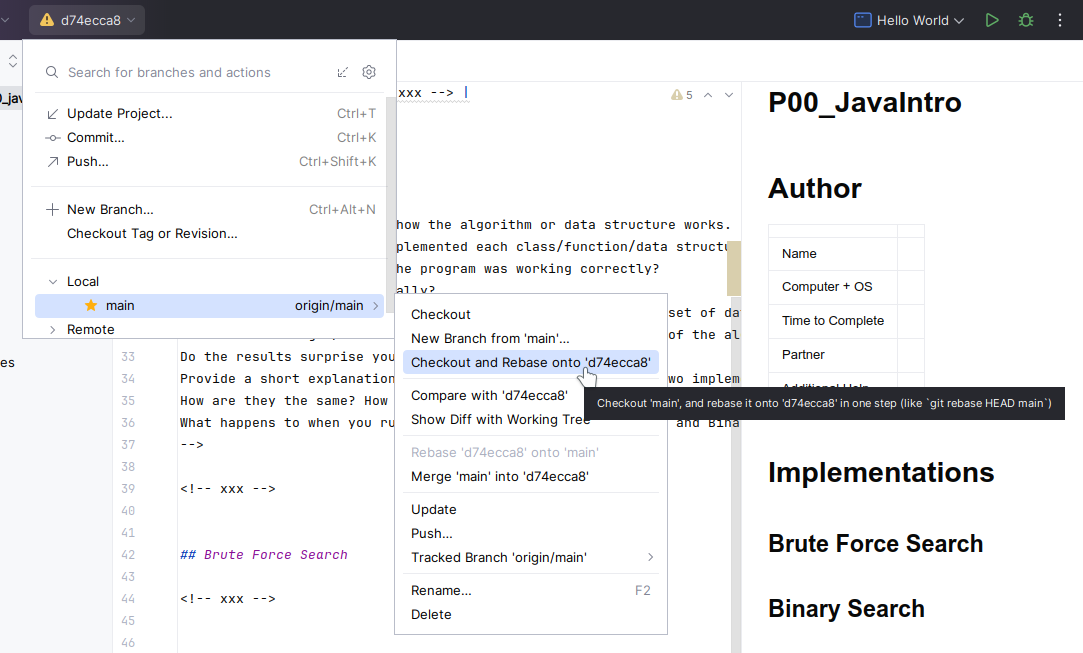
After reattaching, IntelliJ should not warn you anymore, and you can continue working.
 |
 |
Ask me if you ever get here and cannot figure out how to get back.
Note
The random combination of letters and numbers is the "hash" of the commit.
Committing Changes
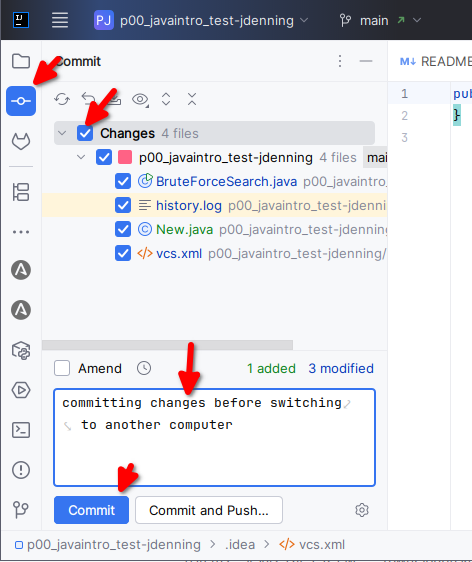
Changes you made locally (on your machine or in your CSE login) are only visible to you on the current machine. The steps below will commit your changes to your local repo.
- Click
Commiticon in left panel, or pressAlt+0(zero) - Select all changes
- Type in a reasonable message that provides a summary of the changes
- Click
Commitbutton
Note
IntelliJ basically combines the staging and committing of changes in one single step.
Pushing Commits
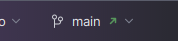
Commits you have made to your local repo are only visible to you on the current machine.
The steps below will push your local commits to the CSE GitLab repo.
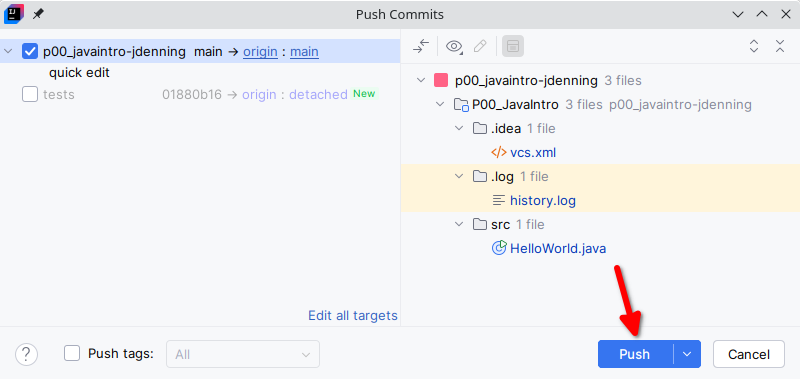
IntelliJ will indicate that commits are ready to be pushed by adding a green arrow pointing up-right next to main branch dropdown in the main toolbar.
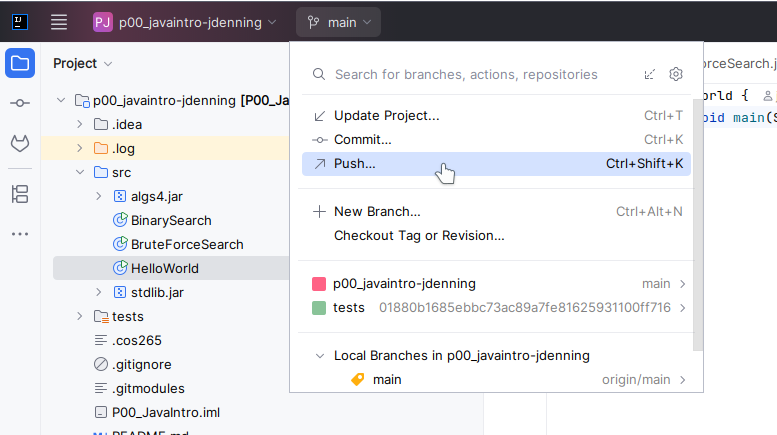
- Click
Push...under themainbranch dropdown in the top bar - Make sure the project is checked
- Click
Pushbutton
 |
 |
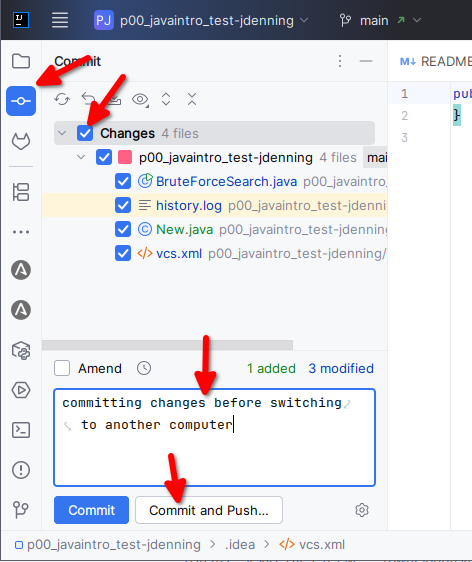
Alternatively, you can stage, commit, and push all in one go using the Commit and Push... button.
Pulling Commits
If you are working on two or more machines or with a partner, changes made on one machine will not automatically show on another. The steps below will pull into the current machine any changes you have pushed to CSE GitLab.
- Click
Update Project...under themainbranch dropdown in the top bar - Choose
Merge incoming changes into the current branch - Click
OKbutton
Note
Git is pretty good at merging changes together unless the changes modify the same line of code. If git is unable to automatically merge in the changes, it will declare a "Merge Conflict", and you will need to merge the changes manually.
Issues #
Each implementation part of the project will have a corresponding Issue on GitLab.
These Issues will serve as the communications channel between you and the automated tester.
To see the issues, go to the corrensponding project on GitLab and click Work items in the left panel.
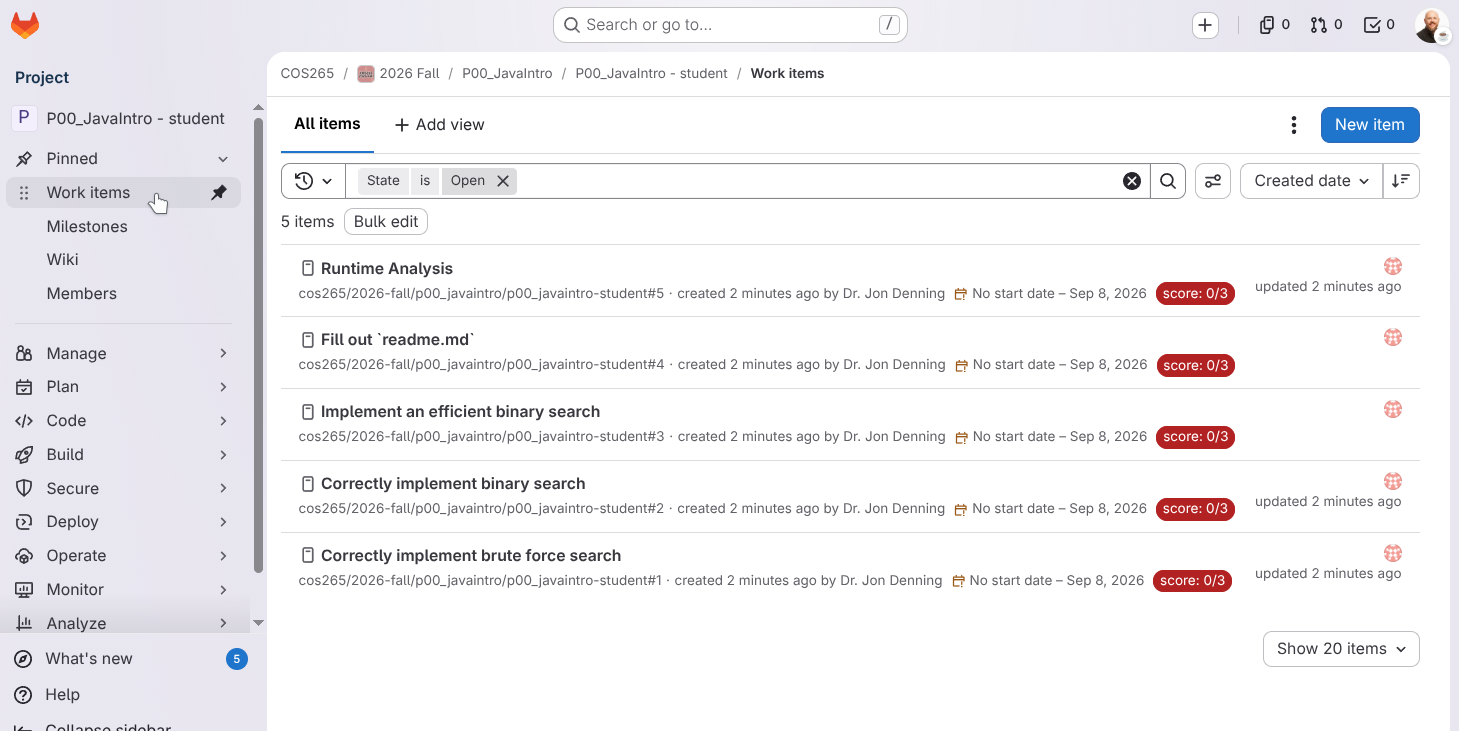
Note that initially every issue will have a label of score 0/3 (or some multiple of 3), because you have not solved that problem yet.
But as you solve the issues, the automated tester will update the label with the appropriate score to indicate how many points your implementation has earned.
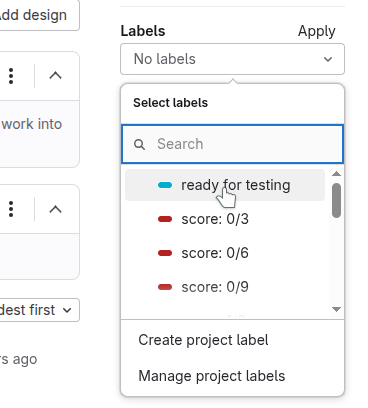
When you are ready to have your implementation tested, do the following.
- Go to the Issues page on GitLab for the project
- Click on that specific Issue
- In the right panel, click
EditforLabels - Type or select the
ready for testinglabel- You can leave any other labels on there
- Click
Apply
The automated tester will run tests against any issue that has the ready for testing label.
See the Automated Tester section below for more details.
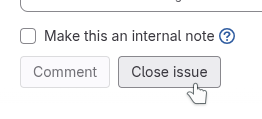
When you think you have completely finished solving an issue, you can close the issue.
Closing an issue will trigger another test to run.
If you wish to run a test after you have closed the issue, you can either reopen the issues then close it again or add the ready for testing label.
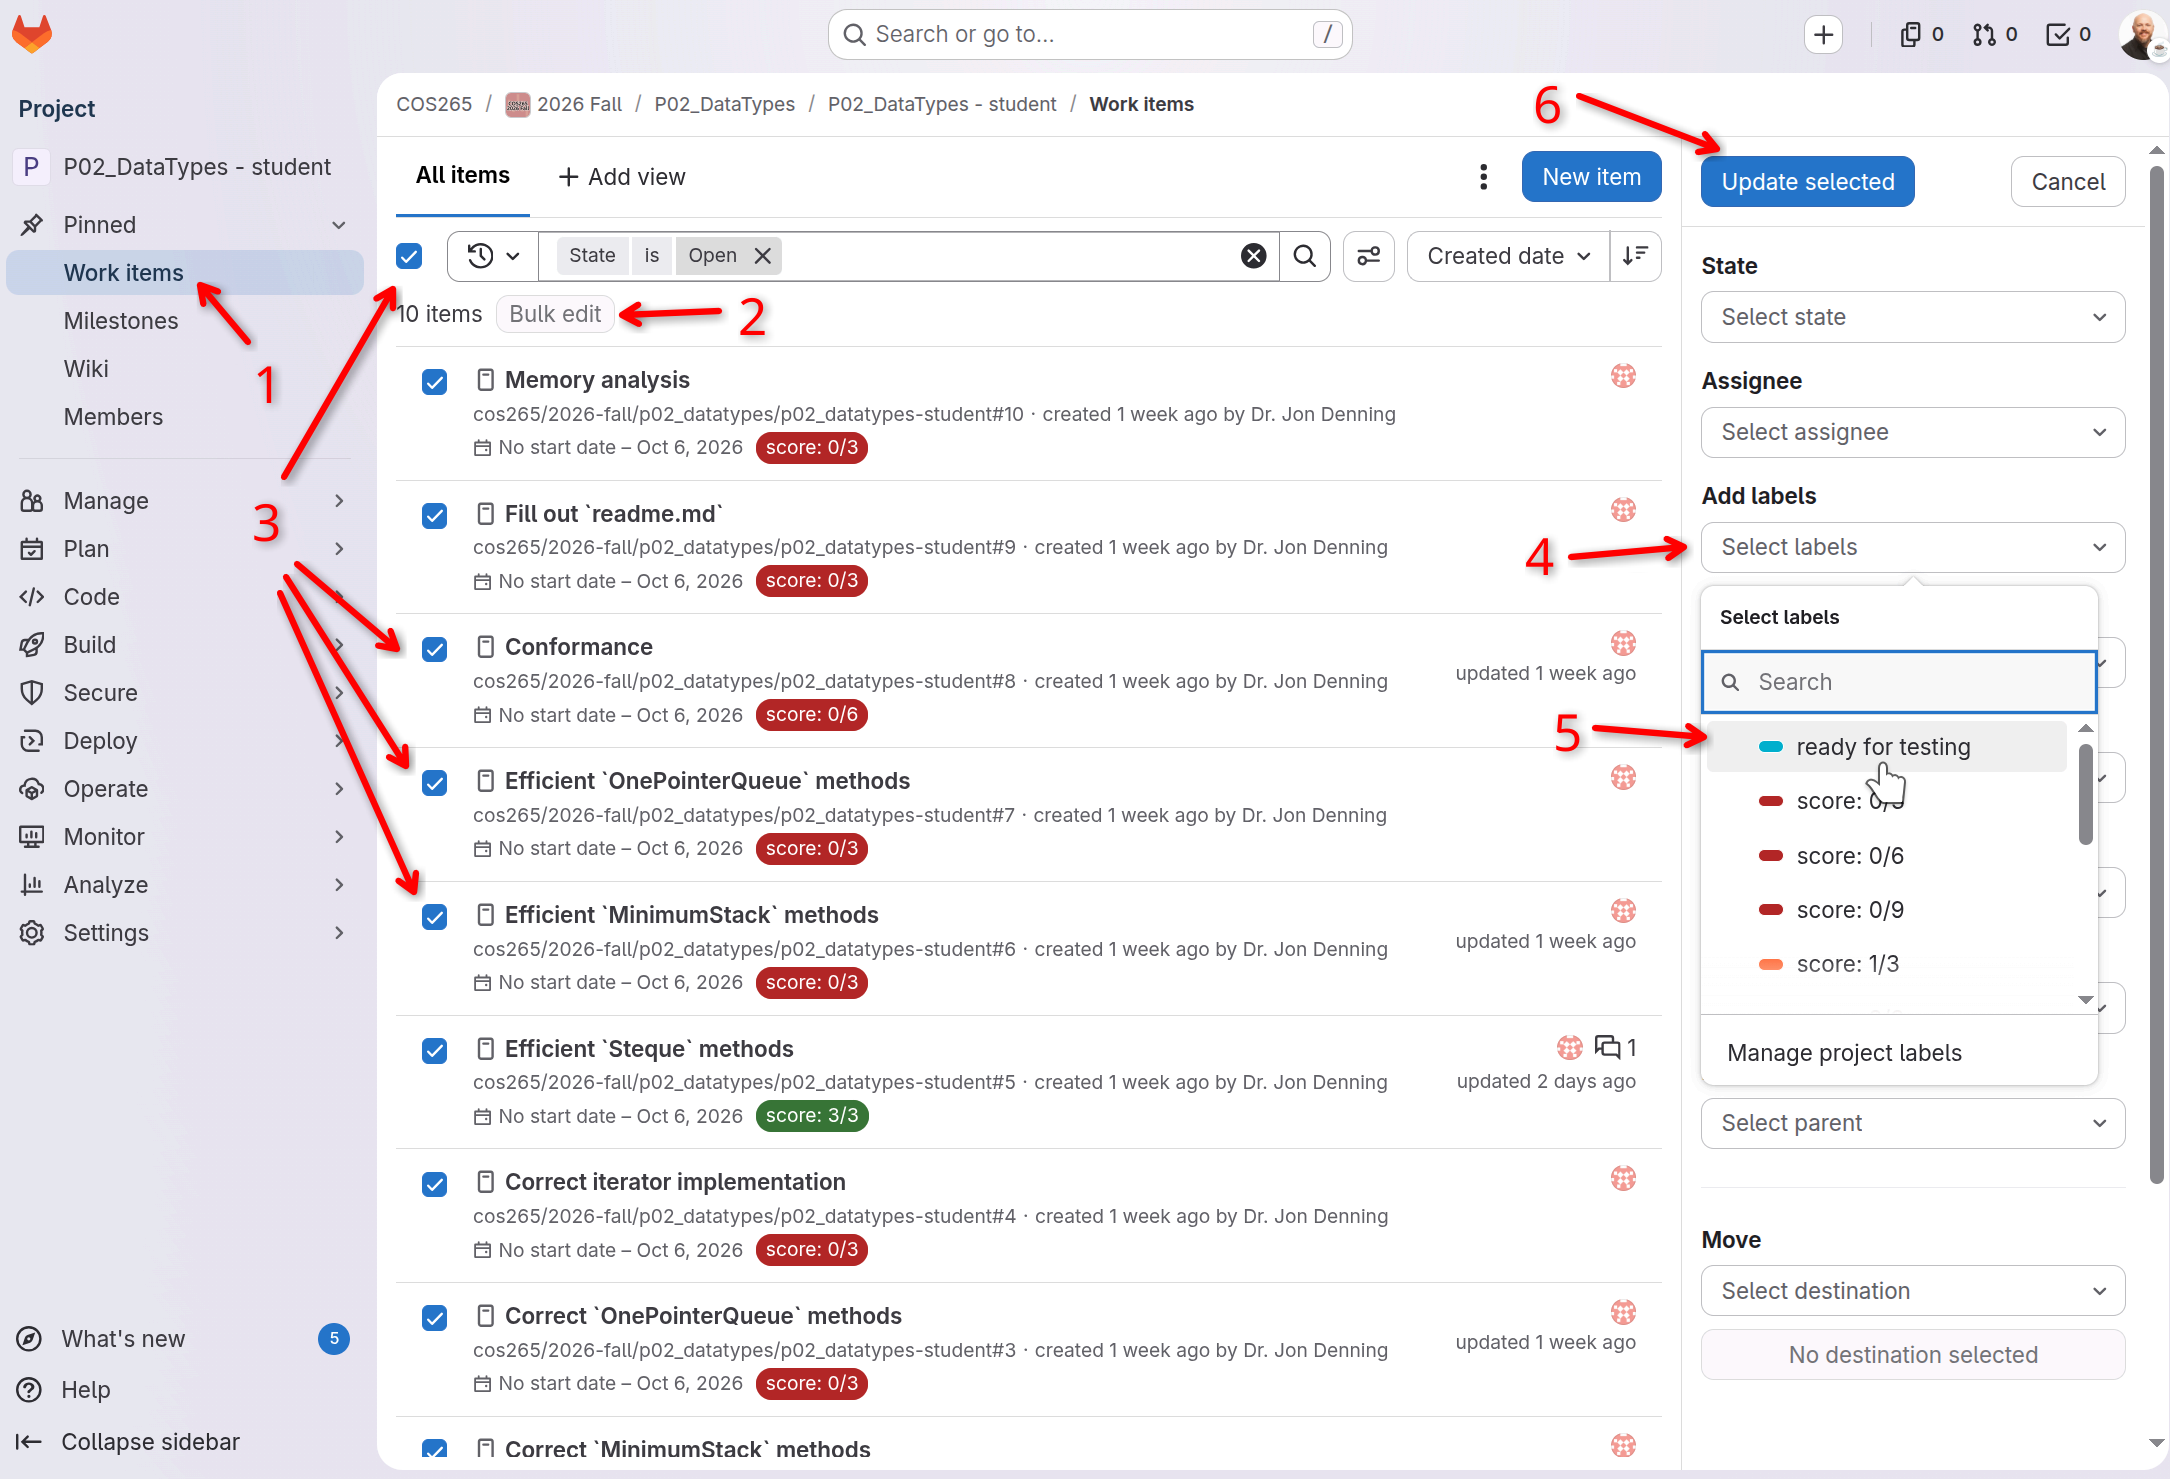
You can add ready for testing label on many issues all at once using the Bulk Edit feature.
- Go to
Work Itemsfor the project (not your general work items across all projects) - Click
Bulk editbutton - Either check the box just under
All itemsto select all issues, or check the issues you would like to test. - Open the
Add labelsdropdown on the right side. - Choose
ready for testing. - Click the
Update selectedbutton in top-right corner.
Updating Fork #
If I find a bug in the source code, I will update it and send out an announcement to update your fork.
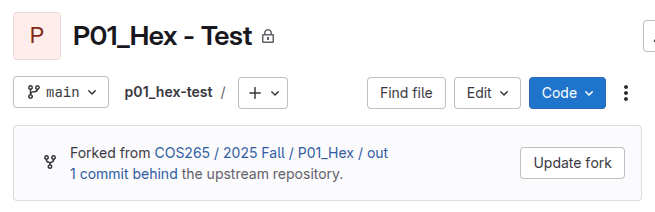
Here are the steps to do this.
- Go to your Project page on GitLab.
- Click on the
Update forkbutton at the very top. - That's it!
If you get a message about merge conflicts, come talk with me.
Automated Tester #
The automated tester will give you feedback on each of the implementation parts of the project.
Here are a few important notes:
-
The tester runs at the end of the day, just shortly after midnight, up until the due date.
- The tester may also run a few extra times during the last day of the project.
-
Only recently closed issues or issues marked with the label
ready for testingwill be tested. -
The tester will test your code based on what is pushed to the CSE GitLab on the
mainbranch at the time the tests are ran.- Be sure to push your commits that you want tested!!
- Changed code will not be tested if it is not committed and pushed to the CSE GitLab.
- Committed code will not be tested if it is not pushed to the CSE GitLab.
-
If your code does not build, all tests will fail.
- Take care not to commit and push broken code!
- Do NOT import any package that was not explicitly allowed in the write up. My tester has a limited set of packages installed, so importing anything outside what is stated in the write up may result in a build fail! Talk with me if you have any questions.
- Do NOT change the API! If you change the name of a method, the order of arguments, add/remove an argument, change the return type, etc., the tester will not build and you will get 0s.
-
The tester will update the labels and add a note to the tested issue.
- The
score: x/ylabel indicates how many points your implementation will receive for the issue.
- The
-
Sometimes the tester will fail to test correctly or report the results.
- If you see an empty report or if you believe the results are incorrect, send me a message over Slack.
-
The tester will send a message to the
#cos265-2026-fallSlack channel ascos265-autotester.

Note
While the tester is pretty good, the automated tester is not perfect. If the tester reports results that you did not expect, talk with me.
Reading Tester Results
Test results will be added as a note to the corresponding issue. Here are details on how to read the report.
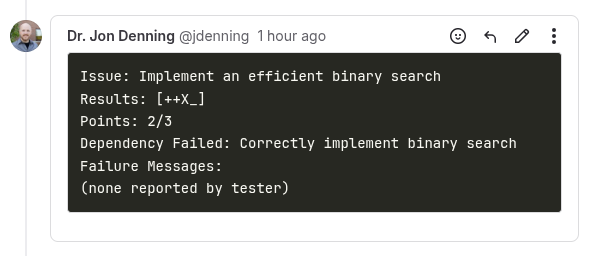
The Issue: line should match the issue's title.
The Results: line shows the result of each of the tests that were run inside the square brackets ([ and ]).
The table below describe what each of the possible results mean.
| Symbol | Description |
|---|---|
+ |
Test was run and passed. |
X |
Test failed, likely due to returning the wrong result. |
$ |
Test failed, because it took longer than expected to finish. |
E |
Test failed, because an unexpected exception was thrown while testing. |
M |
Test failed, because it ran out of memory while running test. |
~ |
An unexpected exception was thrown while testing, but the tester ignored the exception. |
_ |
This test was not run for some reason. Ex: a previous test failed, so later tests did not run. |
! |
Your code had a bug that prevented the tester from running fully. We fixed it so the tester could run, but we deducted at least 1 point for the fix. |
The Points: x/y line shows how many points were earned based on the tests passed/failed.
If you do not make any other changes to your code, this is likely the score you will get for this part of the project.
Some issues depend on another issue passing before it can be tested.
For example, you must have a correct implementation of Binary Search before we can test the efficiency of Binary Search.
It does not make much sense for a function to be efficient if it is incorrect.
If the other issue passes with at least 2 out of the 3 points, then the current issue will be tested.
If the other issue does not pass, then the current issue will be skipped (not tested).
If you see a Dependency Failed: line, that means that other issue failed, so the current issue was not tested.
Finally, you will see a Failure Messages: line followed by any possible hints that the tester gives if you fail a test.
Note: not all tests will provide hints, especially from those that test interesting edge cases.
Score Labels
The score: x/y labels tell you exactly how many points your implementation will receive for that particular issue, assuming you do not make any other changes.
This means that you can know what grade you will receive for the implementation parts of any project at the end of every day.
But, you must commit, push, and mark issues ready for testing to get this helpful feedback!
If you do not get started until a day or two before the due date, you will not have time to receive any feedback!
Important
Start early and submit often!
Submitting an Assignment #
There are a few steps to submitting an assignment.
Importantly, we will grade the code that is committed and pushed to the main branch on CSE GitLab before the due date.
The main steps to submitting an assignment involve:
- Make changes to local files
- Commit those changes to your local repo
- Push commits from local repo to CSE GitLab
- Close all issues for assignment (optional)
That's it!
Warning
Only the commits pushed to CSE GitLab will be graded. Any commits pushed to CSE GitLab after the due date will be ignored, even if the work was done before the due date (with earlier timestamps).